How to Build a Consistent AI Character Across Images and Video (2026)
A 2026 workflow guide to building a consistent AI character: lock a face reference with Flux Kontext, generate a character sheet, carry identity into video with Vidu, Kling, and OmniHuman, hold consistency across multi-shot sequences, and render hero frames at 4K — all on one Martini canvas.
Key takeaways
- Consistency is a workflow property, not a model setting: lock one canonical character reference, then wire that single reference into every downstream image and video node so identity holds across the whole project.
- On the image side, generate the character with Nano Banana 2 (multi-image reference, strong identity), then preserve the face through outfit and accessory swaps with Flux Kontext — edit only the targeted region so the face never drifts.
- Carry the character into motion with reference-to-video models: Vidu for fast iteration, Kling 3 and Kling Avatar for performance and dialogue, and OmniHuman for audio-driven talking heads — all reading the same image references.
- Hold identity across a multi-shot sequence by referencing the canonical library on every shot (never a derived take), so the same person recurs across an entire scene instead of drifting shot to shot.
- Finish hero frames at 4K by chaining a consistent take into an image-upscale node — consistency first, resolution last — so the long-tail "4K consistent character" workflow is one wired graph on the Martini canvas.
Build a consistent AI character in five steps
To build a consistent AI character across images and video in 2026, lock one canonical face reference, generate a character sheet from it, carry that same reference into a reference-to-video model, hold the reference across every shot in a sequence, and upscale the hero frames last. The identity stays stable because every generation reads from the same source reference rather than from the previous take. That single discipline — one reference, wired everywhere — is what separates a recognizable recurring character from a face that slowly becomes a different person by generation four.
A consistent AI character is one whose face, build, hair, and signature wardrobe stay recognizable across hundreds of generations, weeks of production, and multiple teammates on the same project. Most people who attempt this hit a wall fast: the face drifts, the hair restyles itself, the eye color shifts a shade. The cause is almost never the model in isolation. It is that the workflow was never set up to enforce identity at every step. Consistency is a property of the canvas, not of any single render.
This guide walks the five steps in order — lock the reference, build the character sheet, go reference-to-video, hold multi-shot identity, and upscale to 4K — and shows how the Martini canvas turns each step into wired nodes instead of a folder-naming discipline you have to remember. The signature move is the same throughout: keep one character reference pinned and wire it into every node, so the reference-to-video handoff (Flux Kontext face into Vidu, Kling, or OmniHuman) happens in one place.
Why AI characters drift (identity loss across generations)
Text-to-image and text-to-video models do not "remember" a character. Each generation re-derives a face from the prompt and a random seed, so two runs of the same prompt produce two related-but-different people. The more generations you stack, the wider the identity spread. This is the core reason an AI character drifts: there is no persistent identity unless you supply one as an image reference on every single run.
The most common mistake amplifies the problem: chaining references through derived takes. You generate shot one, like it, and use it as the reference for shot two; then shot two seeds shot three, and so on. Each hop introduces a small drift, and small drifts compound. Over twenty shots, the cumulative error is visibly a different person — same haircut, different bone structure. The fix is to always reference the canonical source, never the last result you happened to like.
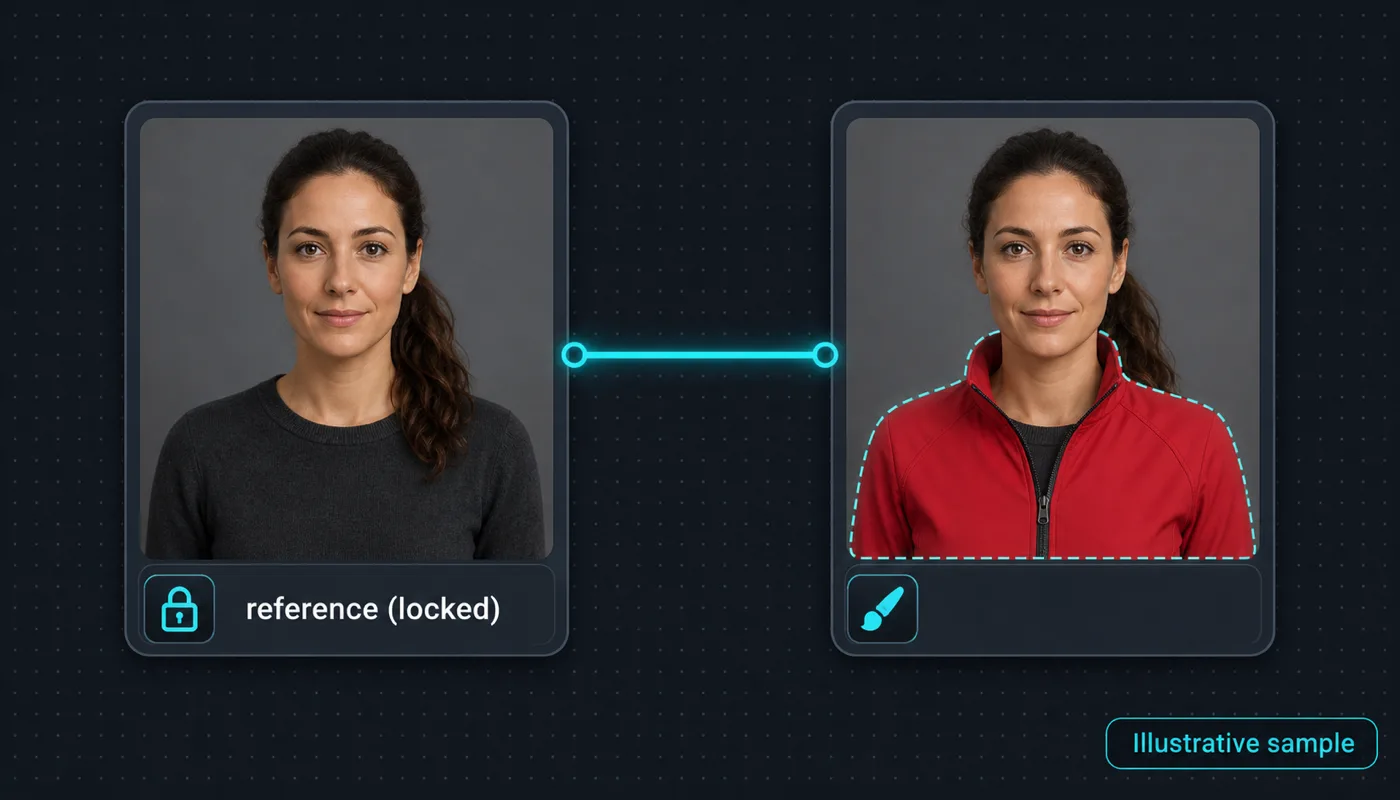
The second mistake is editing the whole frame when you only meant to change one thing. Re-prompting a generation model for a new outfit re-rolls the face along with the clothes, because the model regenerates the entire image. The professional pattern is surgical: change the outfit with a targeted edit model that preserves everything else. That is exactly what Flux Kontext is for, and it is the backbone of step two.
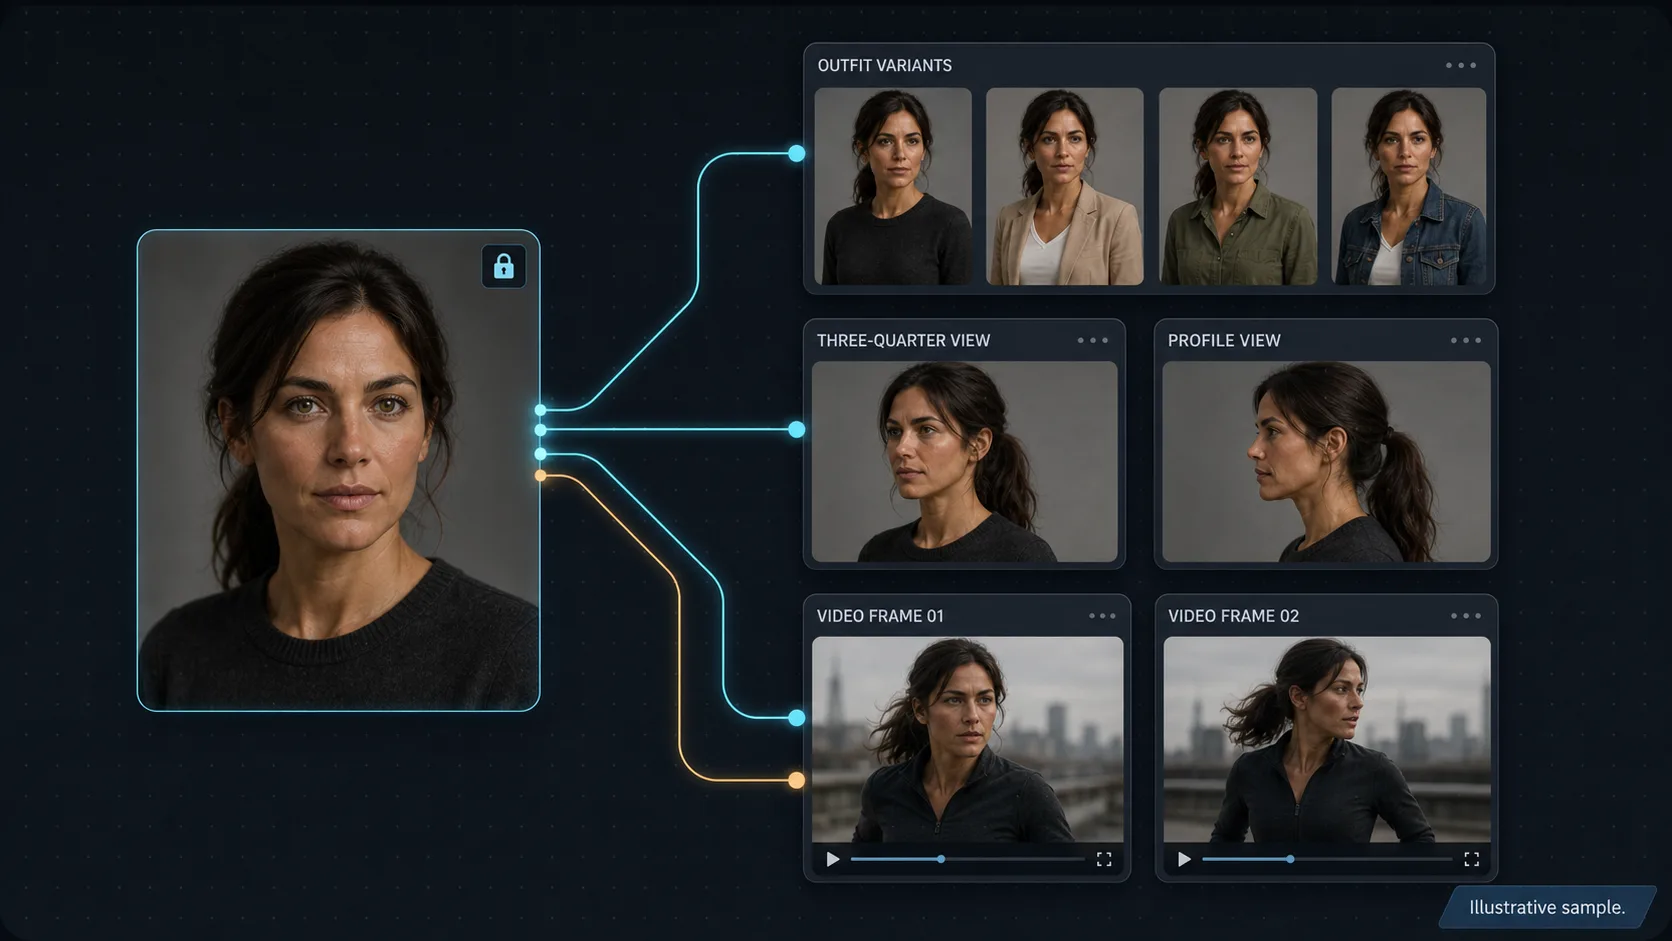
Step 1 — Lock a character reference (Flux Kontext face preservation)
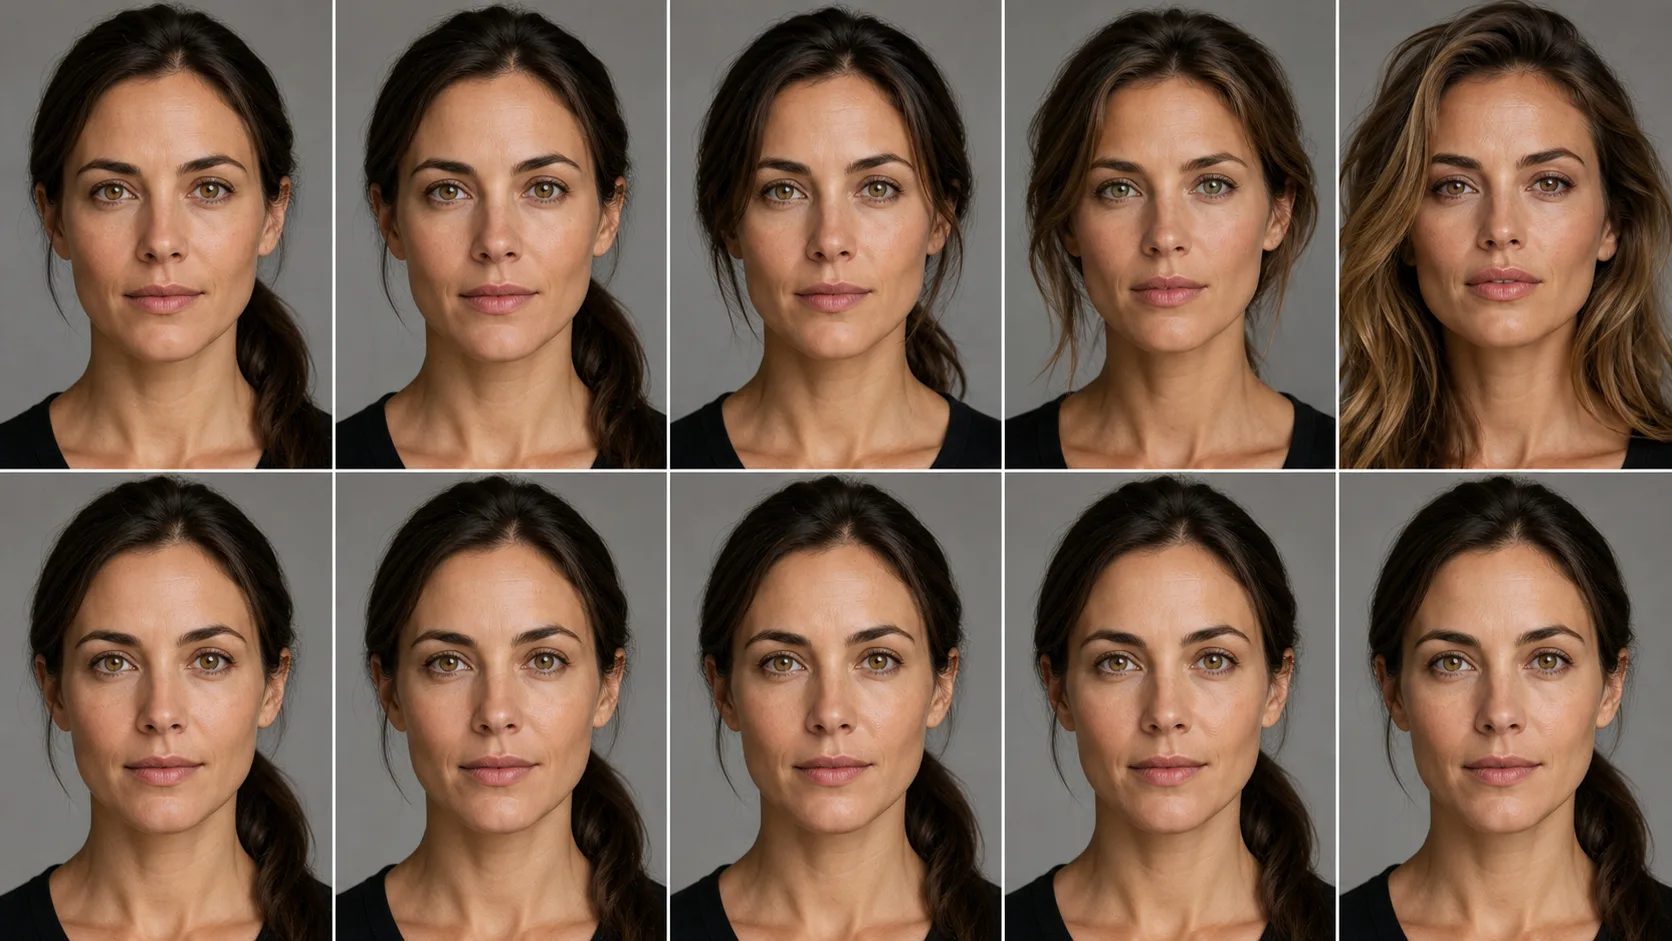
Start with one detailed character description in text: age range, build, ethnicity, hair color and style, eye color, distinguishing features (a freckle, a scar, a particular jawline), and signature wardrobe. Specificity is leverage. "Mid-thirties woman, athletic build, dark brown hair in a low ponytail, hazel eyes, small mole above the left eyebrow, charcoal cashmere sweater" is workable. "Beautiful young woman" is not — it gives the model nothing to hold constant.
Drop a Nano Banana 2 image node, paste the description, and generate four to six front-view takes. Pick the strongest as your canonical front view and pin it in the version tray. This pinned image is now the source of truth: every downstream node references it, never replaces it. Nano Banana 2 is the canvas's strongest character model precisely because it accepts multiple image references and stabilizes identity around them.
For face preservation when you change anything, reach for Flux Kontext rather than re-prompting. "Flux kontext face preservation" is a literal search query because Kontext edits only the region you target — swap a jacket, fix a stray hand, recolor a background prop — while the face, hair, and pose stay locked. On the canvas, wire a Flux Kontext node downstream of the chosen Nano Banana 2 take, mask the region to change, and prompt only that change. The identity you locked in step one survives every edit, which is the whole point of locking it first.
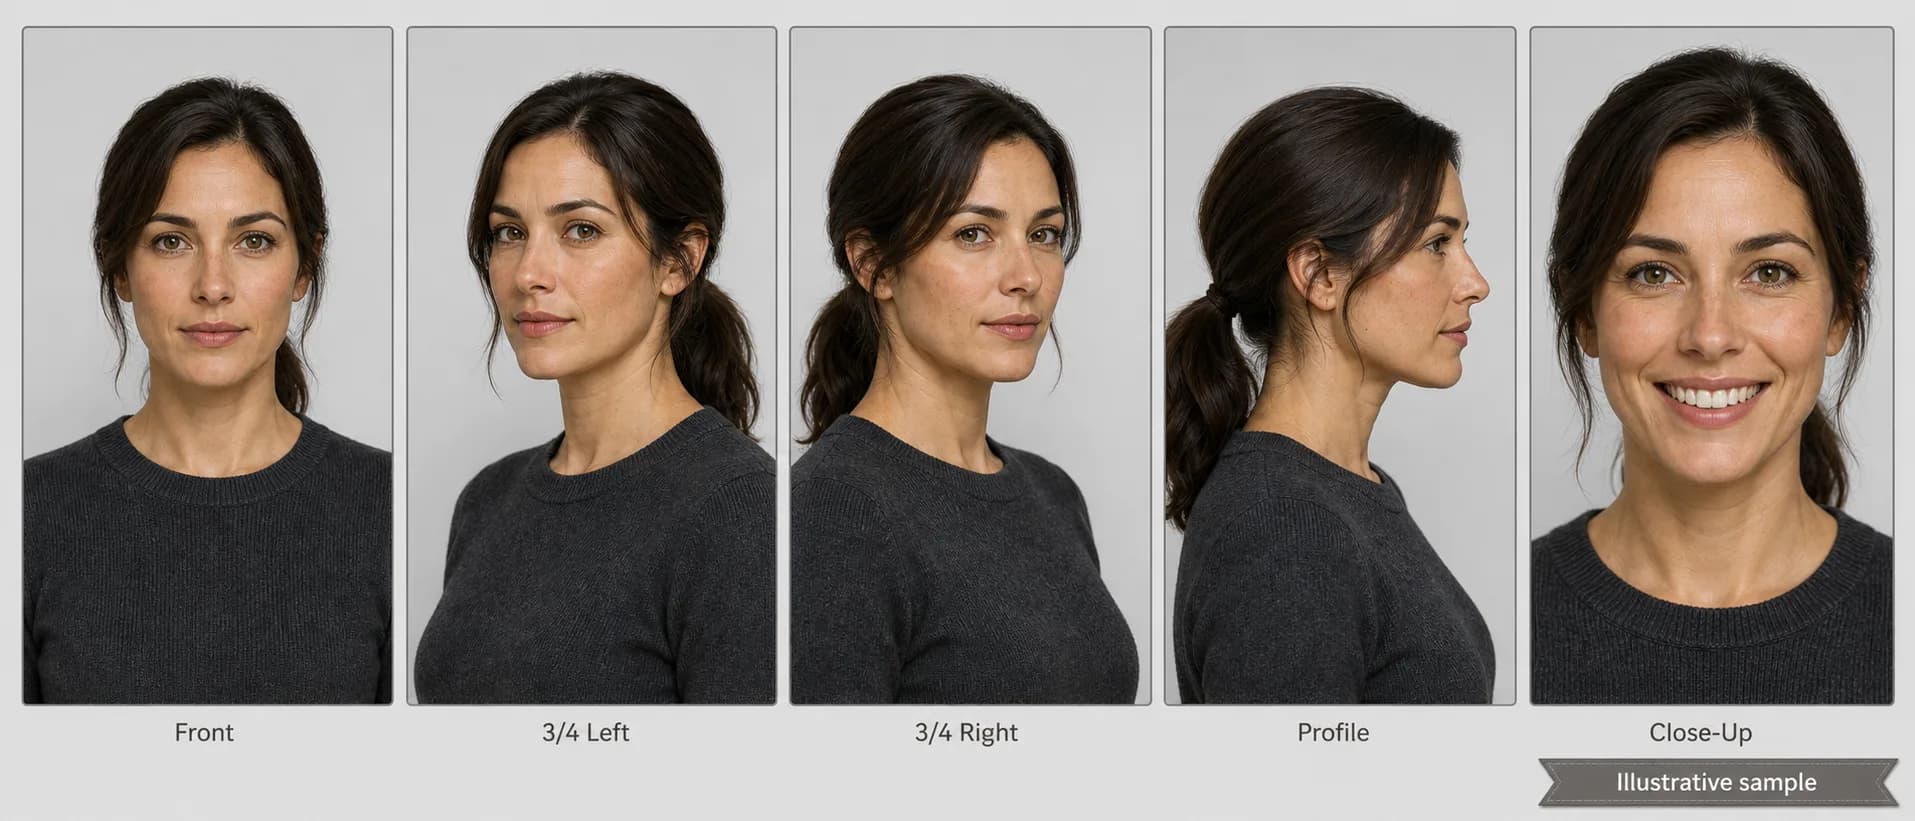
Step 2 — Generate a character sheet (outfit, angle, and scene variants)
A character sheet is the minimum reference set that defines your character at every angle and expression you will need downstream. Duplicate the Nano Banana 2 node four times. In each duplicate, wire the canonical front view in as a reference and prompt for an additional view: three-quarter left, three-quarter right, profile, and a smiling close-up. Pin the strongest take from each. Five canonical references — front, three-quarter left, three-quarter right, profile, smiling close-up — is the minimum library to start.
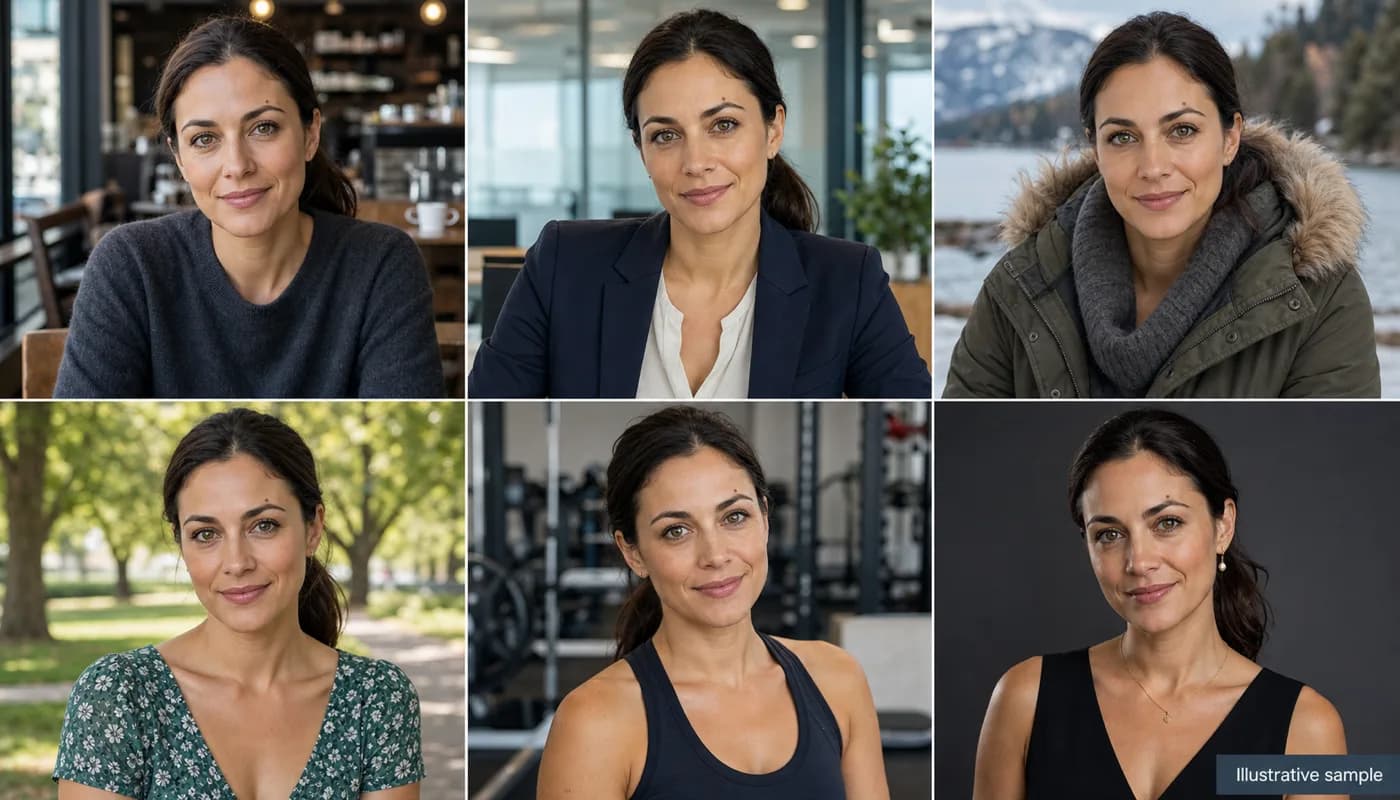
For more demanding work — an AI-influencer feed, a recurring spokesperson, a brand mascot — expand the sheet to ten or fifteen seeds covering more outfits and more emotional expressions. To build the outfit variants without touching the face, run each base take through a Flux Kontext node and swap only the clothing region. Same character, ten outfits, all derived from one identity-locked base. This is the production backbone of any character-driven content feed: a small, curated sheet that the whole project generates against.
Once the sheet exists, every new shot is a multi-reference generation, not a fresh text-to-image gamble. Drop a Nano Banana 2 node for the new scene, wire in three or four sheet images chosen for the shot (front plus three-quarter for face anchoring, smiling close-up if the scene needs that expression, a full-body reference for wides), and write the prompt as action and environment first, then explicit attribution — "referencing image 1 for face and hair, image 2 for outfit, proportions following image 4." Be explicit about which reference governs which attribute and the model will follow you.
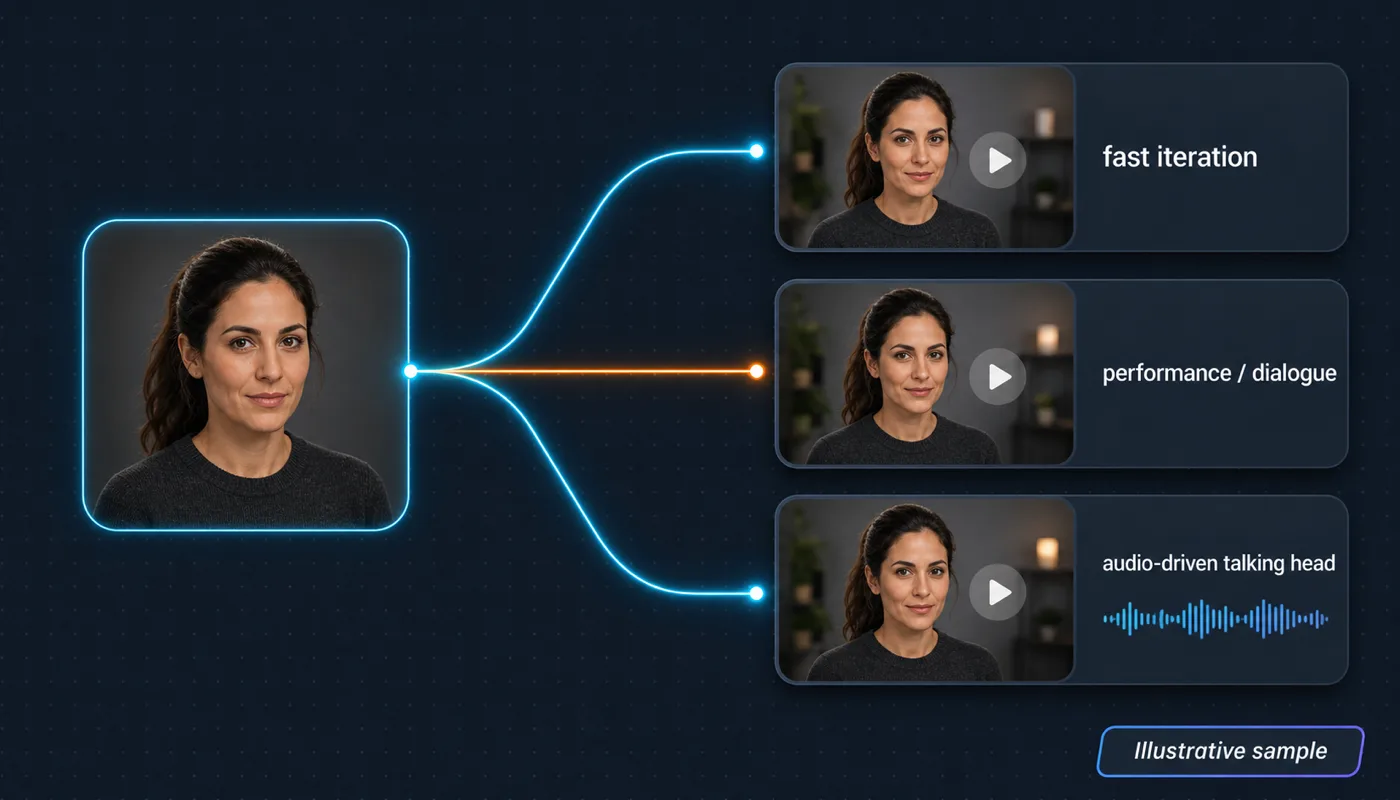
Step 3 — Carry the character into video (reference-to-video: Vidu, Kling, OmniHuman)
Image-side consistency is the prerequisite for video consistency. Without a stable sheet, your video drifts frame to frame and shot to shot. With one, the reference-to-video models that respect image input strongly will hold identity through motion. The reference-to-video handoff is the heart of the workflow: the same character references that anchored your stills now anchor your clips, so you never re-establish the face from scratch when you move from image to video.
Three video nodes do most of the work. Vidu is the fast-iteration choice when you want many reference-driven character clips quickly. Kling 3 — and especially Kling Avatar for dialogue — is the pick for character-driven shots with subtle performance and lip-sync. OmniHuman is the audio-driven talking-head model: feed it a character still plus a voice track and it animates a convincing performance from a single reference image. For each shot, wire one or two sheet images into the video node, choose them for the angle and expression the shot needs, and write the motion prompt as a single take with one clear action.
For talking-head episodes, the cleanest chain is a Nano Banana 2 still into Kling Avatar or OmniHuman, with the dialogue track coming from an ElevenLabs or Fish Audio node on the same canvas. Avatar and OmniHuman handle lip-sync; the pinned still holds the face. Because every Avatar node references the same image library, a recurring spokesperson looks like the same person across every episode even when the script and scene change. That is "character consistent production" — identity is shared infrastructure, not something you re-fight per clip.
Step 4 — Keep consistency across shots on one canvas
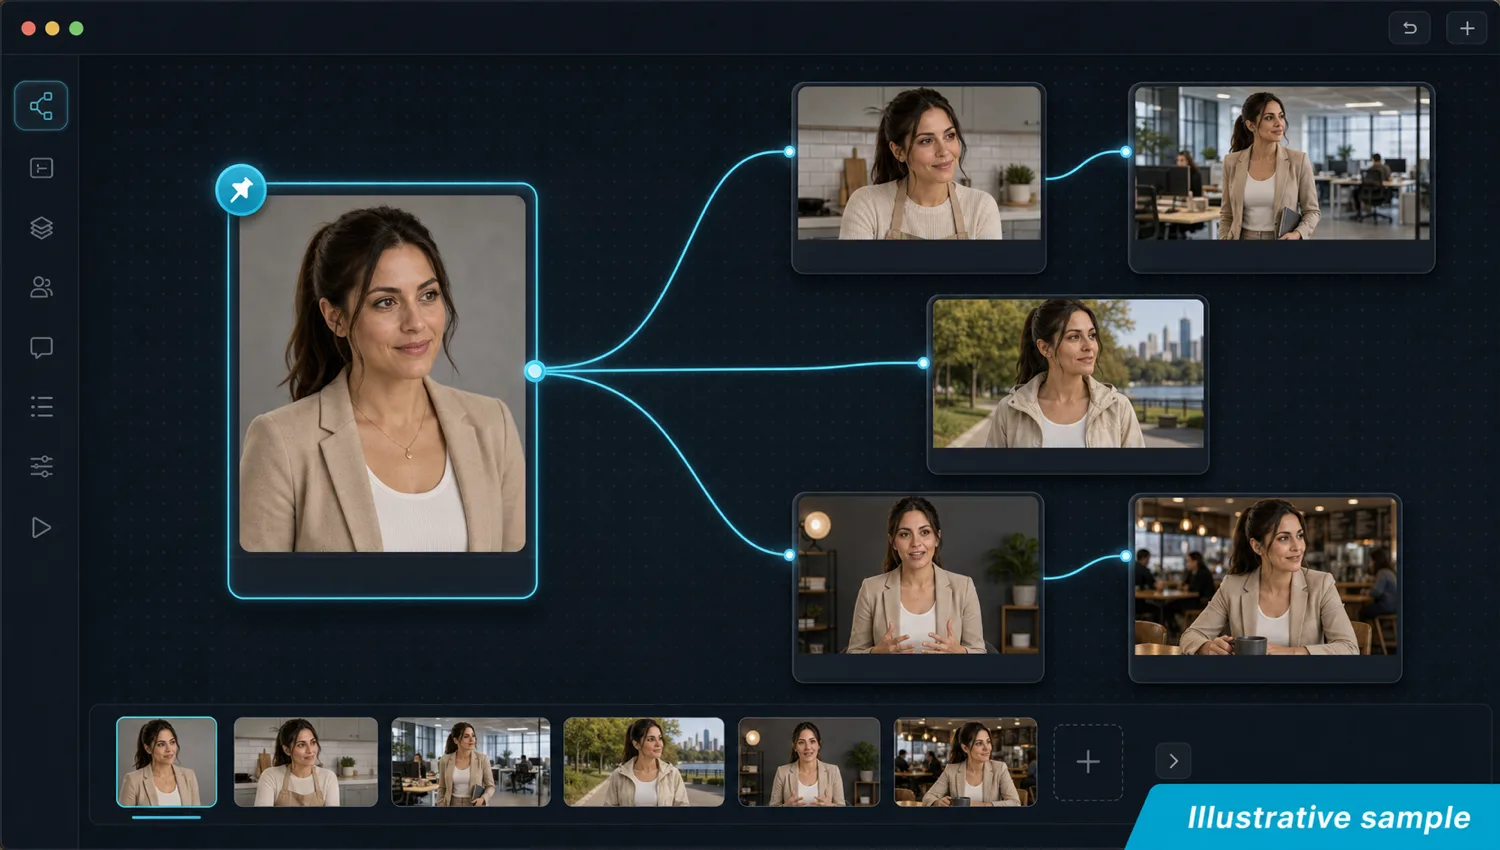
Maintaining identity across a multi-shot sequence is where most tools quietly fail, because they treat each shot as an isolated job. The rule that keeps a character consistent across multiple shots is the same one from step one, applied at sequence scale: every shot references the canonical sheet directly, never the previous shot. On the Martini canvas this is structural — pin the sheet once, then wire those same pinned references into every image and video node in the sequence. No shot ever seeds the next.
This is the Martini wedge. Single-tool workflows solve consistency inside one model or one generation; the moment you cross from an image edit to one video model to a second video model, you lose the thread. On one canvas, the same character reference is wired into a Flux Kontext edit, a Vidu clip, a Kling shot, and an OmniHuman talking head simultaneously — the fan-out pattern. Run a prompt across several models at once, keep every take in the version tray, and compare them against the identical reference. Identity holds across image edits, multiple image-to-video models, and multi-shot sequences because the reference is the one shared constant.
Editability is the deeper payoff. Update the canonical front view and every downstream node re-renders against the new reference. Swap the wardrobe in Kontext and every video node downstream picks up the new outfit. Reorder a sequence by re-wiring. Character consistency stops being a battle you fight every shot and becomes a property of how the canvas is wired — which is also why a teammate opening the project sees the same sheet, the same pins, and generates against the same identity with no separate file structure to maintain.
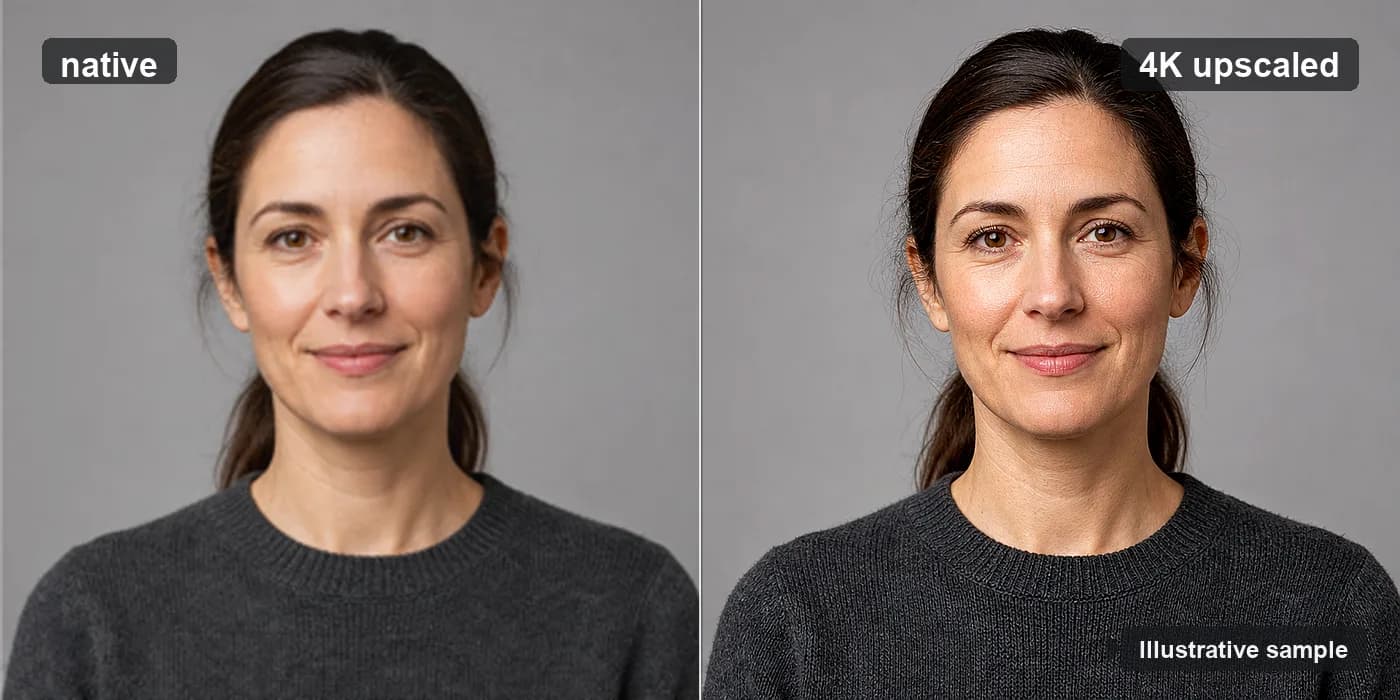
Step 5 — Render hero frames at 4K (upscale consistent takes last)
Resolution is the last step, not the first. Generate and lock identity at the model's native resolution, choose the hero frames that nailed the character, then upscale only those. "4K consistent character rendering" is a real long-tail query, and the workflow that wins it is simply consistency first, upscale last: never chase 4K before the face is locked, because upscaling a drifted take just gives you a sharper wrong person.
On the canvas, wire a chosen consistent take into an image-upscale node (Topaz and Magnific are both available) to take a hero portrait to 4K with clean skin, hair, and fabric detail. For video, send a locked clip through a video-upscale node to finish a hero shot at 4K without re-rolling motion. Because the upscale node sits downstream of an already-consistent take, the identity you protected through four steps carries straight into the high-resolution master.
Keep the sheet curated as the project runs. Three to four references per generation is the sweet spot; a fifty-image library passed eight at a time loses the precision that makes the reference workflow worth it. Pin new canonical references as a new outfit or expression becomes signature, retire weaker takes, and let the next round generate against the tightened set. The library is a living document, and the canvas is its single source of truth.
How Martini changes the consistency workflow
Outside a canvas-based tool, character consistency is a discipline problem solved by spreadsheets, file naming, and remembering which version of which image is the "real" one. Most teams give up halfway and settle for "close enough." On the Martini canvas, consistency is a structural property of the workspace — the sheet is pinned, every node references it, the version tray remembers every take, and the fan-out pattern lets one reference drive many models at once.
The result is a single graph that spans the whole workflow this guide describes: lock the face with Nano Banana 2 and Flux Kontext, build the sheet, fan the reference into Vidu, Kling, and OmniHuman, hold identity across every shot, and upscale the heroes to 4K — with NLE export downstream so the consistent sequence leaves the canvas as a finished cut. No downloads, no re-uploads, no external editor between steps. That end-to-end wiring is the reason character-consistent production lives on one canvas instead of across five disconnected tools.
Workflow example
Recurring spokesperson series on Martini: build the five-pose canonical sheet with Nano Banana 2 (front, three-quarter left, three-quarter right, profile, smiling close-up) and lock the face. For each weekly episode, drop a Nano Banana 2 node for the new scene (kitchen, office, outdoor walk, studio backdrop), wire in the front and smiling references, and pin the chosen still. Use Flux Kontext to put the character in that episode's outfit without touching the face. Drop a Kling Avatar or OmniHuman node downstream, wire the still plus an ElevenLabs audio node carrying the script, and prompt for "subtle gestures, eye contact with camera, slight head movement on emphasis." Render two takes, pick the stronger, send the hero frame through an image-upscale node for the thumbnail, and wire the clip into the NLE export node with intro and outro. Repeat per episode — the character looks like the same person every week because the sheet is shared across every node.
Recommended models
Recommended features
Related models and tools
Related how-to guides
Related comparisons
Related reading
Nano Banana 2 Workflows for Multi-Image Reference and Character Consistency
Multi-image reference and character consistency workflows on Martini using Nano Banana 2.
Kling 3 Guide: Variants, Use Cases, and How to Choose
Kling 3, O3, and Avatar variants — when to use each, on Martini.
How to Turn an Image Into a Video With AI (2026)
Turn any still image into an AI video in 2026: prep the source, pick the right image-to-video model, prompt motion as a camera move, add start/end frames, then fan one image across Seedance 2, Kling 3, and Veo at once on the Martini canvas and pick the best take.
Frequently asked questions
- How do I keep an AI character consistent across images?
- Lock one canonical reference and generate every new image against it. Build the character once with Nano Banana 2, pin a five-pose sheet (front, three-quarter left and right, profile, smiling close-up), then wire three or four of those references into every new Nano Banana 2 generation. The face stays because each shot reads from the same source library rather than from the previous take.
- Which AI model is best for face/identity preservation?
- Nano Banana 2 is the strongest model for generating an identity-stable character because it accepts multiple image references and stabilizes the face around them. For edits, Flux Kontext is the face-preservation tool — it changes only the region you target (an outfit, a prop, a stray hand) and leaves the face, hair, and pose untouched, which is why re-prompting a generation model drifts the face but Kontext does not.
- How do I carry a consistent character into AI video?
- Use a reference-to-video model and feed it the same image references you used for stills. Vidu is best for fast iteration, Kling 3 and Kling Avatar for performance and dialogue, and OmniHuman for audio-driven talking heads. Wire one or two sheet images into the video node so the clip inherits the locked identity instead of re-deriving a new face from the prompt.
- Why does my AI character's face change between generations?
- Because the model re-derives a face from the prompt and a random seed on every run, so it never "remembers" your character unless you supply an image reference. Drift compounds when you chain references through derived takes — using shot one to seed shot two, and so on. Always reference the canonical source library directly, never the last result you liked, to keep drift bounded.
- Can I keep a character consistent across multiple shots?
- Yes — reference the canonical sheet on every shot and never let one shot seed the next. On the Martini canvas you pin the sheet once and wire those same references into every image and video node in the sequence, so the same person recurs across the whole scene. This is the Martini wedge: one reference wired across image edits, multiple video models, and multi-shot sequences at once.
- How do I render a consistent character at 4K?
- Consistency first, resolution last. Lock identity at the model's native resolution, pick the hero frames that nailed the character, then send only those through an image-upscale node (Topaz or Magnific) for a 4K portrait, or a video-upscale node for a 4K clip. Upscaling sits downstream of an already-consistent take, so the locked identity carries straight into the high-resolution master.
- Should I train a LoRA instead of using a reference library?
- Usually not. LoRA training takes time, needs curated data, and locks you to one model. A multi-image reference sheet on Nano Banana 2 gives most of the consistency benefit, runs on the canvas immediately, and adapts as the character evolves. Consider LoRA only for very high-volume work where the per-generation cost saving justifies the training overhead.
Ready to try it on the canvas?
Open Martini and fan your prompt across every frontier model in one workflow.